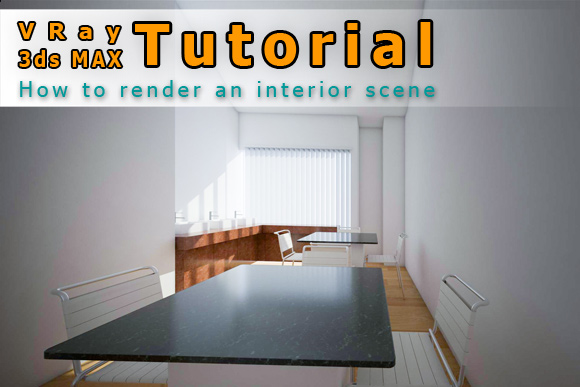
This is Kanak and I want to explain you here exclusively on tonytextures.com how you can easily set up a daylight interior scenery in 3ds MAX by using VRay rendering engine with a bit of Photoshop correction of the RAW rendering afterwards.
I would love to call my approach rendering through the eye of a photographer. I think this is the best way for you to learn how to render without knowing a thousand of parameter. I will go through following steps to explain my method:
- Modeling the scene
- Creating the materials for the scene
- Select your camera view
- Set up the lighting day or night. Remember: Because of we are using the photographic way we do not need to change the lights default parameters a lot. Instead we can manage it with the camera.
- Choose the correct camera exposer. This is really important because with right exposer I mean right shutter speed, F-number and ISO (parameters that determine photos in real live) It is important to understand that a physical camera in VRay needs to be set up just like the real worlds DSLR cameras
- The post production is the last step – but it is a really important one! Every photographer tries to get the most out of his photos in Photoshop, so do we. Therefore I save my rendering in RAW format to have full control in Photoshop afterwards.
Before we start I want to give a small shoutout to our free “openArchiVIZpack” we use for a lot of our archi viz tutorials. We put together here 60 archiviz graphics like cutout trees, plants and people as well as tileable textures and sky background images. And you are even allowed to use it for commercial projects – so no excuse anymore to grab it now:

3D Model of a Standard Office Room
OK – so let´s get started:
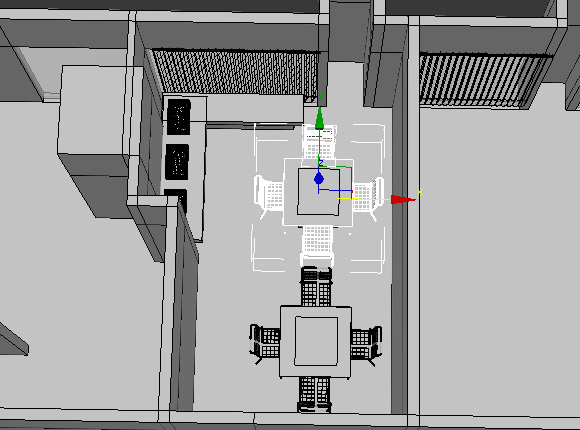
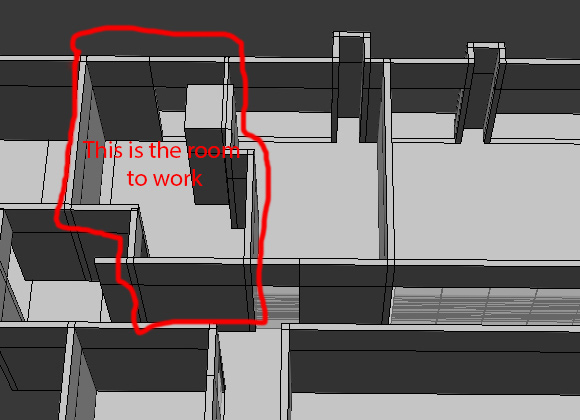
I have created a standard 3d office room that should be used for this interior daylight rendering tutorial. I also put in some basic 3D furniture low polygonal models – nothing special.
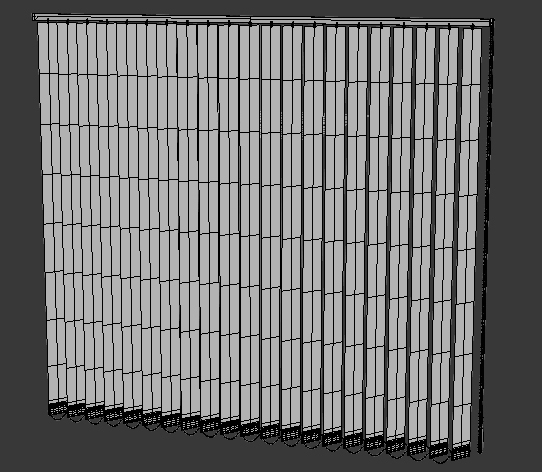
Because the light should fall through the window I also imported very simple vertical blind as window curtain to create some nice effects with the daylight.
Enable Gamma/LUT Correction in 3DS MAX
The first step is to “Enable Gamma/LUT Correction”. You will find it via Customize>Preferences on the “Gamma” tab.
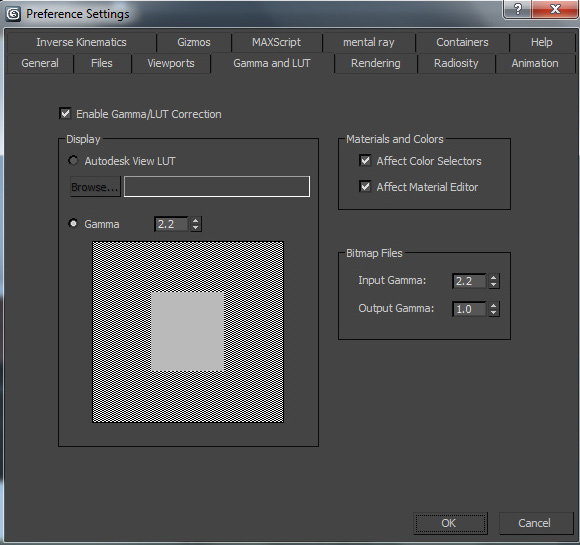
Basically, gamma is the relationship between the brightness of a pixel as it appears on the screen, and the numerical value of that pixel in the rendering. Because we want to to render a RAW image (physically correct) we deactivate with this step the increase of brightness which will normally automatically be created because the screen itself will reduce the brightness again.
Background information for geeks: Almost every computer monitor has one thing in common. They all have an intensity to voltage response curve which is roughly a 2.5 power function. Don’t be afraid, this just means that if you send your computer monitor a message that a certain pixel should have intensity equal to x, it will actually display a pixel which has intensity equal to x ^ 2.5 Because the range of voltages sent to the monitor is between 0 and 1, this means that the intensity value displayed will be less than what you wanted it to be, but we want the real values because we export the result as RAW and correct it in Photoshop afterwards.
OK, if you understood this part you made the hardest part, if not – it does not really matter 😉
Let´s go back to the 3d model. It is a complete level of an office building but for this tutorial we only concentrate on one single office room.
Setting up VRay Materials in 3DS MAX
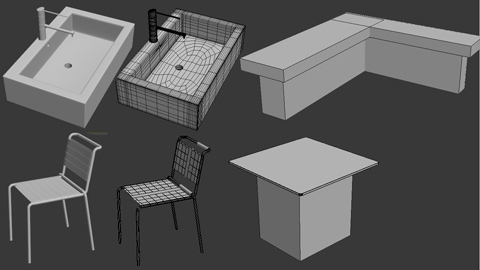
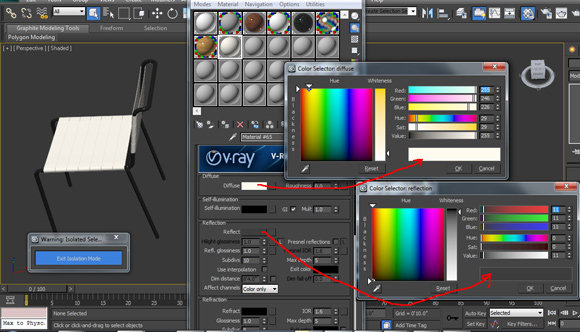
First I create some VRay materials for the main elements. Open the material editor (shortcut M) and pick an unused material. For the dining table top I created an easy marble material, but you can use also another texture of your choise.
- Tileable marble texture image as “Diffuse Map”
- Change the color of the reflection to white
- Reflection Glossiness: 0.9
- Subdivs: 25

For the chair I created two different VRay materials. One is a SS Stell metal material and the other one looks just like simple white plastic. See the settings I made in the screenshot:

For the other table I also used a marble texture like for the other table as well:

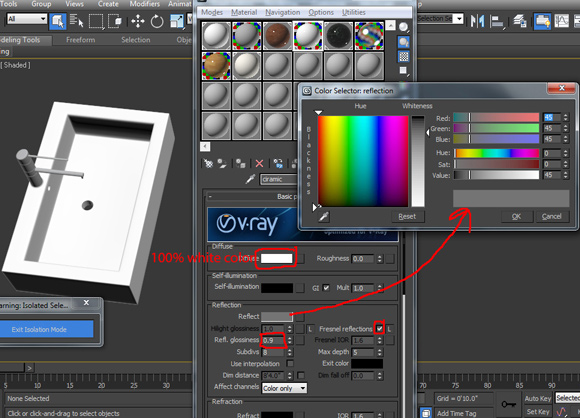
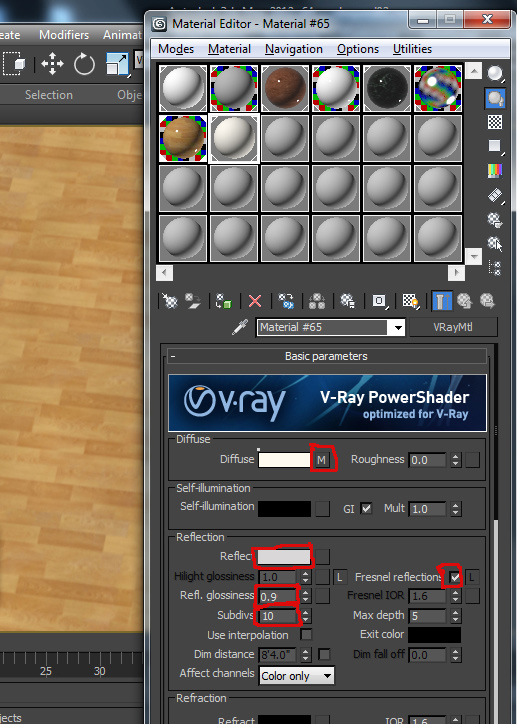
Afterwards we create also a VRay material for the basin
- Choose a white for the diffuse color
- Choose a grey color for the reflection color
- Activate “Fresnel reflections”
- Refl. Glossiness value: 0.9
High Resolution Wooden Strip Parquet Texture for the 3D Floor
For the floor I use this high resolution tileable strip parquet texture:
You can download it for free at tonytextures here for free. You are even allowed to use the texture for your commercial projects!
Free Download: High Resolution and Seamlessly Tileable Strip-Parquet Floor Texture
I use the texture also as diffuse map in 3ds MAX and add afterwards some glossiness and reflections:
- Set reflection color to light white
- Activate “Fresnel reflections”
- Refl. Glossiness value: 0.9
- Subdivs: 10
Create a VRay Physical Camera
Next we will create a VRay physical camera. To do so, select Create>Camera>VRay (from drop down menu) >physical camera.
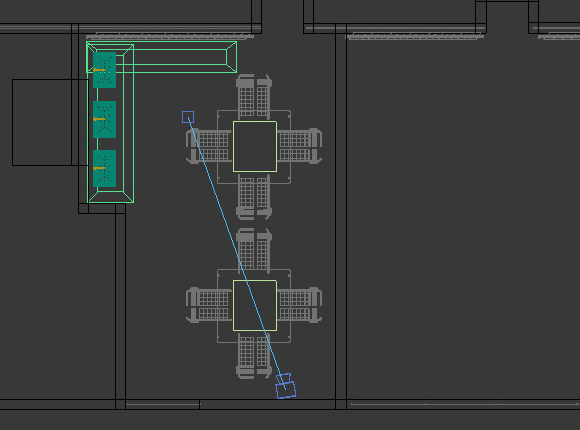
Afterwards press “c” to activate your camera view. Then choose a nice camera position.
Use a “VRay plane light” for your interior architectural scenery
The light should be generated by a light emitting plane that we place in the window. To do so create a VRay plane light by selecting Create>Light>VRay>VRay Light. Afterwards modify the parameters like shown in the screenshot:

It is important to activate “Cast Shadows” to ensure that shadows will be generated and also activate “Invisible” because the plane itself should not be visible in the final rendering.
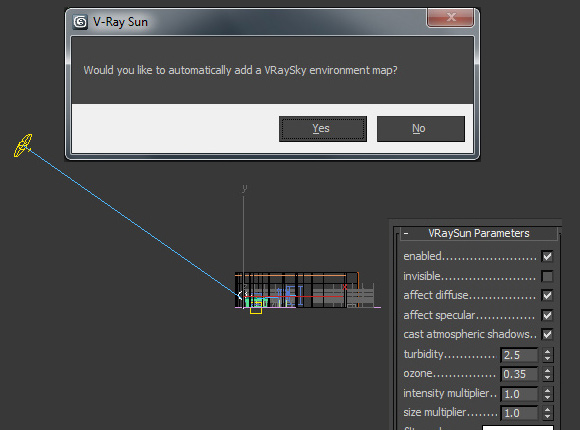
Add a VRay sun to the scenery
In addition we need a VRay sun. To do so select Create>Light>VRay>VRaySun and set the target inside of the window. When you are going to create a sun you need to confirm the upcoming dialogue („Would you like to automatically add a VRaySky environment map“) to automatically add a VRaySky environmental map.
Parameters for VRay Physical Camera for Interior Scenery

For the camera setup I first changed the custom balance to white. If you want to make your image brighter then you have two possibilities (like you would have with your DSLR-camera as well):
- You can lower the f-number
- You can change the shutter speed for the camera
Four Most Important Parameters of a Physical Vray Camera
Let me explain the four most important parameters of a physical Vray Camera:
- Shutter speed: Stutter speed can control the brightness of your scene. A lower shutter speed lets more light reach the photo chip of a DSLR. More light = brighter image. Or the other way around a faster shutter speed give less light pass – the image becomes darker. In real life your image can have blur effects when the shutter speed is too long and your scenery is in motion. But in 3ds MAX it will not have an blur effect because nothing is moving.
- F-Number: F-number is the parameter of your cameras aperture. A lower f-number mean wider aperture and thus more light = brighnter image. A higher f-number means a narrow aperture and thus less light = darker image. It is important that it affects the depth of field but in VRay if you are not using the depth of field effect then that also doesn’t matter.
- ISO: ISO is the film speed. Higher ISO = bright image, lower ISO = dark image. In real life a higher ISO can cause a noisy image but not in a VRay physical camera.
- White balance: It means to identify the right white color for camera. You can make it neutral in VRay
So finally you see that the physical VRay is even more powerfull as a real world DSR camera and does not have some major disadvantages.
Render Setup for VRay and Indirect Lightning
After this short detailed description I change some parameters in the Render Setup to achieve a fast, but also realistic result.
– Common Settings: Set Output Size to “HDTV (video)”
– VRay Settings:
- Activate: Frame buffer/Enable built-in Frame Buffer
- Activate: Global switches/Lights and Global switches/Shadows
- Select: Image sampler (Antialiasing)/ Type: Adaptive DMC
- Activate Image sampler (Antialiasing)/Antialiasing filter: on and select VRayTriangleFilter
- Select: Color mapping/Type: Exponential and make settings like shown in the screenshot blow
– Indirect Illumination:
- Activate VRay Indirect Illumination
- Select Irradiance map as GI engine under Primary bounces
- Select Light chache as GI engine under Secondary bounces
- Set parameters at Detail enhancement
- Set Subdiv to 1500 at Calculation parameters
- Activate Store direct light at Calculation parameters
- Activate Pre-filter under Reconstruction parameters and also “Use light cache for glossy rays” with a Retrace threshold of 1.0
– Settings:
- Set Min samples to 15
- Set noise threshold to 0.005
- Set Dynamic memory limit to 7000 MB
- And finally activate Low thread priority
See the complete parameter setup shown below:

Render a RAW image with VRay in 3DS MAX and Optimize Lightning in Photoshop
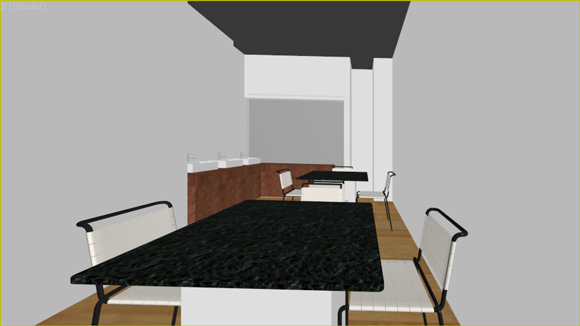
Now it is finally time to start rendering and get results. Here we go!
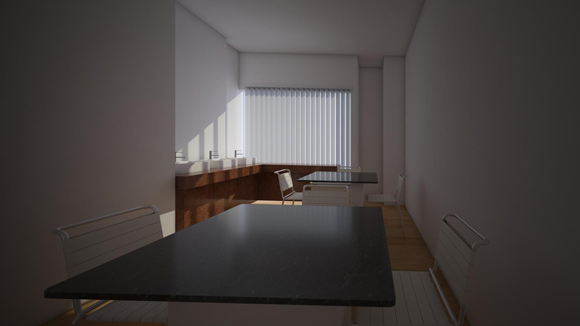
This is my raw output – it’s a bit dark from my point of view but that’s okay. I’ll love to handle this at Photoshop. But of course you can also make additional enhancements by changing the shutter speed and f-number at you VRay physical camera directly.
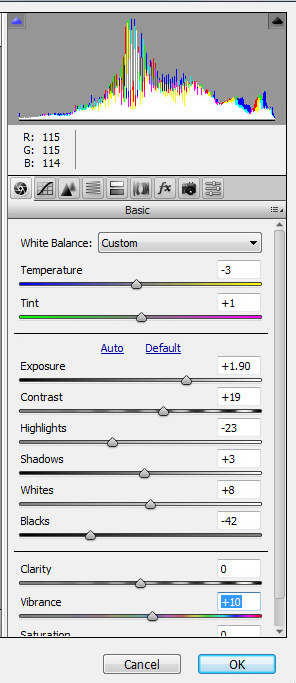
Okay here we are in Photoshop. Go to Filter>Camera raw filter:

And just play around for your right exposer and with the color. It is self explaining and you will get a feeling for the parameters just by testing these out by yourself. See my parameters I ended up with here:
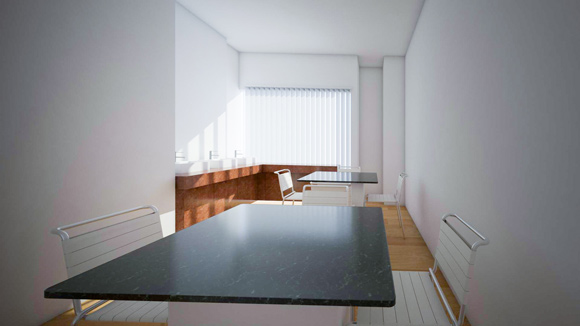
So this is basically it and I am pretty happy with the result:
I know there are quite a lot of settings to be made, but I would recommend you to set up your dummy scenery and use it for your future project as well.
I hope you enjoyed this tutorial! If you did you might also check out our architecture rendering tutorial Interior HDRI lightning techniques with VRAY+ 3DS MAX here!

Great work,thank you
Vary nice and unique tutorail and short and sweet tutorial-
Vary nice and unique tutorail and short and sweet tutoria
Muy Bueno, el acabado en Vray, es grandioso, ademas en este tutorial aprende hasta el mas despistao, Suerte y Gracias por tal desprendimiento
nice tutorial tony, very helpful for us. Great job 🙂
Hello, this weekend is nice for me, as this time i am reading this impressive educational
paragraph here at my residence.
it very good..
It is interesting to me that good graphic designers need to understand programs like V-Ray 3DS max and also filming and photography techniques. For example, in this, it is interesting for you are figuring out lighting for the picture. I have been wanting to get better at design, so thank you for your tutorial.
If you understand the inner settings of rendering application then taking out a quality render is an obvious thing.