
Cutout trees are necessary for nearly every outdoor architectural scenery. They bring live to your architectural visualization and support the viewer to get a feeling of the building proportion or scale. This tutorials will show you how to create a perfect cutout tree in Photoshop.
Step 1 – Start with the right photo
It is important that you start with a good photo. So carefully select a good one! Following characteristics are important:
- a good contrast between the background and the tree itself (e.g. a sky without clouds or a white wall)
- no objects or plants in front of the tree (no additional trees, persons, cars etc.)
- a high resolution of the photo to ease selecting the tree
- a light sunshine makes no odds as you know that in every rendering the sun is shining! It makes sense because the lightning of the leaves can not really be added later.
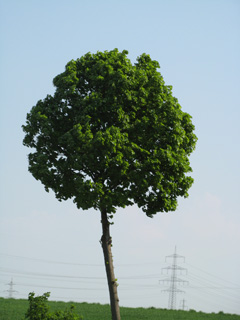
For this tutorial I select following photo:
Step 2: Select Color Range
This method makes use of the different colors in the photo. The tree is green – the background white or blue. We can select different colors in Photoshop with the help of „Color Range“

So we want to select the white-blue of the sky to separate tree from the background. In the dialog box you can use the pipette to choose a first color (e.g. the blue in the photo)
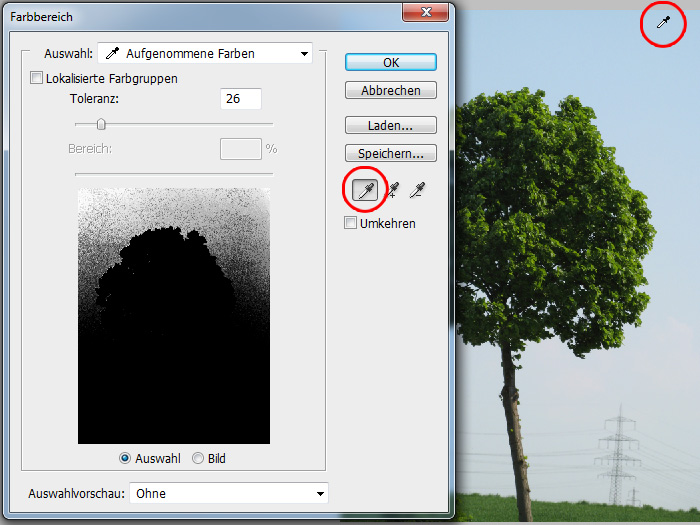
Make sure that you selected the left pipette to select the first color. Afterwards we can add more colors to the selection by using the pipette button whith the little +. In consequence your selection will include now more colors. By doing so you can add more and more colors of the background cover more or less all background white and blue colors. You can also increase the Fuzziness value to include more neighboured colors of your pick. Small tolerance = include a smaller number of neighboured colors. High tolerance = include a higher number of neighboured colors.
So select more and more different background colors by using the pipette button with the + until the contrast of tree and background looks good in the preview window.
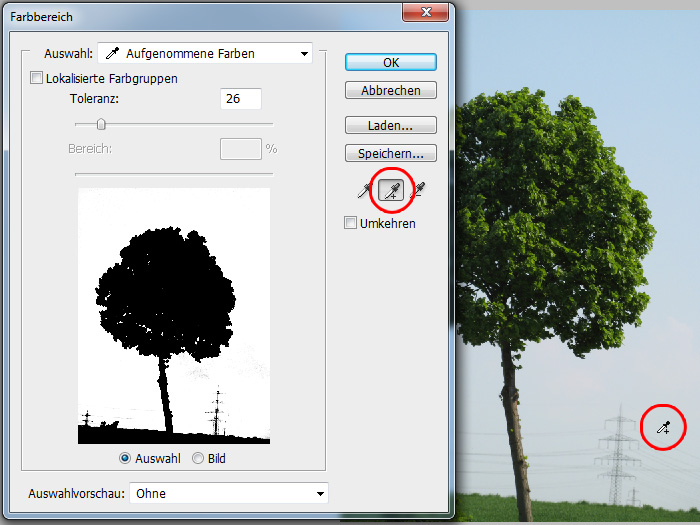
It does not matter if you largely select all relevant background colors because it is important to include as much of the background as possible.
After selecting all background color values, confirm by pressing OK and you will get a selection of the background sky. Because we need the selection of the tree, now invert the selection by pressing SHIFT+CTR+I. Next copy the selection to a new layer (CTR+J)
It is not very easy to get a feeling of the quality whithout a contrast layer to the selection. Therefore create a new layer (SHIFT+CTR+N), fill it whith red (shortcut: G) and drag the new layer behind the tree layer.
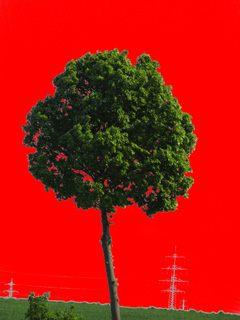
At first sight the selection looks pretty good. But first select the Lasso tool (shortcut: L) the horizon and all elements which are included in the tree layer but not belong to the tree itself. Afterwards delete these elements.
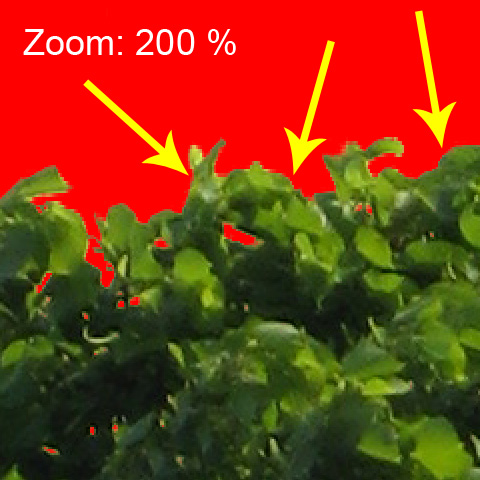
Step 3: Find and delete invisible artefacts
Actually we already can use the cutout tree for our architectural visualisation. But there are follwoig points left to be considered. First there could be more or less invisible color values of the background left which need to be deleted. Depending on the background (clouds, other objects) it is often not possible to select all color values correctly. Note that these missing colors in our selection often are not visible at first sight. Therefore we do the following to make them visible again. Duplicate the tree layer several times and merge the dublicated layers via CTR+M, but do not touch the original tree layer, so only merge the dublicated ones. By dublicate the layer very often, all pixel also with high transparancy will become visible. I think you will be suprised how many invisible pixel will appear. The following comparison shows you the result in my example. You see the basic picture on the left and the result after dublicating the layer on the right:

If the artefacts are too dominant it is a good idea to select the color range again with a higher Fuzziness value. Afterwards you can just select the areas containing the artefacts and delete them manually – obviously in your original tree layer.
To make sure that you catched all pixel you can also use the Magic Wand (shortcut: W) with a Fuzziness of 1 px. Click in the background and Photoshop will mark the selection which gives you an idea of the missed pixel.
Step 4: Optimization of white and blue border of the cutout tree
Very often around the leaves of the cutout tree there are still white or blue borders visible.

There are different ways to optimize the result. Copy the layer with the cutout tree and select Image/Adjustments/Channel Mixer. First select „blue“ for the Output Channel, because we only want to edit the blue colors in the image. Then reduce the value for the blue colors until the blue colors are not that dominant in your image and confirm with OK.
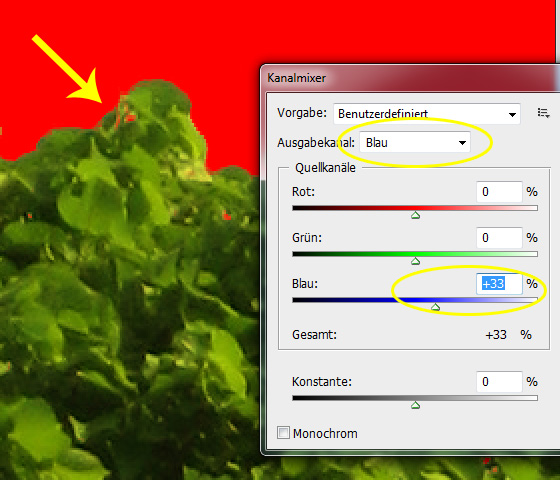
The new layer with the reduced blue colors settings should now be located above the original layer in your layer menue. Now there are two ways to combine both layer.
The easy one is to use the layer blending mode „Pin Light“ for the upper layer with the more green colors. For smaller blue or white borders the result is ok and after merging both layers via CTR+E the cutout tree is ready to usey yet!

If the white or blue borders are still too dominant or to optimize the result even more you can additionaly use Layer/Matting/Defringe. This function will reduce the contrast of the border to the main image content. In my case I used 3 px to reduce the visibility of the border a bit more.
But for all the perfectionists out there there is still a way to optimize the cutout tree even more.
Step 5: Optimize the edges of the cutout tree to the max
If there are still blue or white edges left do not merge the layer with the more green tree down. Keep instead both layer – the green one and the layer with the original selection without the color modification.
We only want to use the edges of the green tree layer. Therefore we need to select only these edges. Thus we first click with CTR pressed on the layer of the cutout tree and you then all opaque elements of this layer – our tree selection – is selected. Next go to Select/Modify/Border with about 5 px to get a border selection. Afterwards feather the selection by pressing Alt+CTRL+D with 1 px to get a softer selection.
Finally you can invert the selection (SHIFT+CRTL+I) and delete the selection from the layer with the green tree layer and merge both layer.
What is the result? We now have overlapped only the white or blue border of our original selection with the greener tree layer. I think the result is pretty cool if we keep in mind that we did not really manually refinished too much:
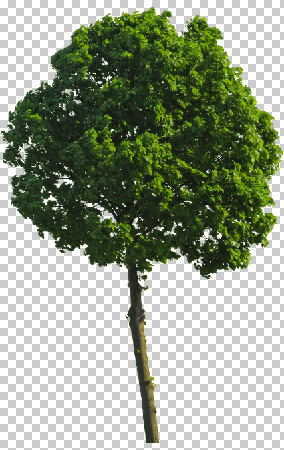
I hope the tutorial how to generate a perfect cutout tree in Photoshop helps you for your projects. Maybe you also have some special techniques to optimize the tricky white or blue borders of your selection. Just drop me a line if you have any ideas or comments.
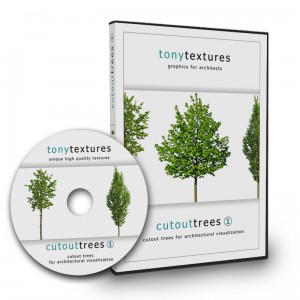
If it is too time consuming for you to mask the trees for your projects on our own behalf we recommend our collections of cutout trees. For example our starter edition “CutoutTrees V01” is comming along with 77 cutout trees and plants at a high resolution for a fair price.
For all who made it though this tutorial to here we have the high resolution cutout tree for free download for you here:
Cut-Out-Tree-Tutorial-Result.zip
P.S. The file can be used for private AND commercial projects. But please note that you are not allowed to share or distribute the file. If you like to shareit whith your friends please simply recommend or link to us. Thank you!

[…] https://www.tonytextures.com/photoshop-tutorial-how-to-create-a-perfect-cutout-tree-via-color-range/ […]