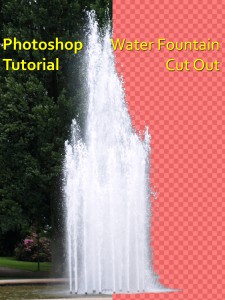
To bring life to a rendered architectural scenery, you sometimes need a nice water fountain. For examle for hotel animations or urban public places.
A common approach is to render your complete scenery and add all decorating elements like cutout persons, plants and also a water fountaine in the post process in Photoshop. But therefore you first need already a masked cutout water fountain. In this tutorial I would like to show you an example how to cutout water quickly.
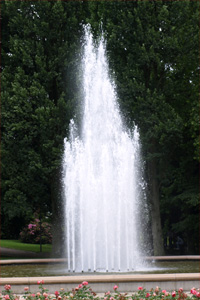
It is helpful if the basic image comes with a reasonable resolution. In addition the water fountain should have a good contrast to the background. I chose this picture:
Step 01: Turn background layer to a general layer
First open your image in Photoshop and turn the background layer to a general layer to have the possibility to make parts of the layer transparent. The lock icon shows you that your layer is an „background layer“.

If you erase parts of a background layer Photoshop will fill the erased areas with the background color instead of making them transparent. To turn the background layer to a general layer you have to double click in between the layer name and the lock icon. Afterwards confirm the dialog with OK and thats it.
Step 02: Create a red contrast layer
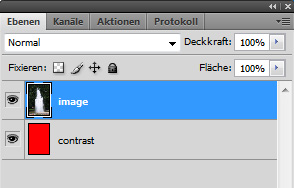
We will cut out the water fountain and to control the selection it is very helpful to create a red contrast layer under our water layer. Therefore create a new layer (SHIFT+Ctrl+N), select a red as foreground color and fill (Shortcut „G“) the new layer with the red color. Now drag the new layer under the image layer.
Step 03: Select and cut out the water fountain
Next we want to cutout the water fountain. Thanks to the reasonable contrast between the water and the background we only need to select the white parts of the image.
I chose an unusual but I think very practicable approach because I want to use the layer style to set the white image parts to transparent. Afterwards we invert the selection to easily select only the water fountain.
Therefore we first copy the the image layer and double click in the layer window next to the layer name to see the layer stile dialog. (or select the copied layer and go to Layer/Layer Style/Blending Options) In the field „Color Range“ we have the possibility to define with a slider a color range which will be set to trasparent. Because we want to fade out the white parts of the image the default selection in the pull down menue „Grey“ is ok for us. Now we drag the right triangle icon on the slider and drag it slowly to the left. You will directly see a preview of the result in your image: The water of the water fountain will be set to transparent and our red contrast layer will be visible instead.
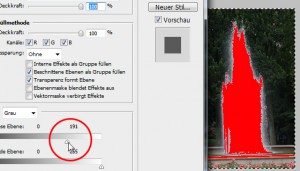
With the slider you define which grey values will be set to transparent (all values which are right to the right triangle icon) Choose a value which result in a quite good preview but note that not too much background elements are selected wich are next to the water fountain. In my case a value of 155 is quite ok:
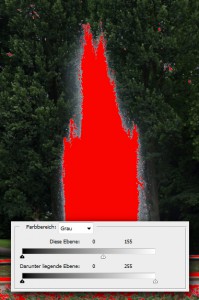
For a quick and dirty compositing this selection is maybe already useful. But I want to use the masked water fountain also for future projects and therefore I try to optimize the result a bit more.
Step 04: Optimize the selection of the cutout water fountain
Currently the selection includes no partly transparent areas. Either a pixel is selected of it is not. To get a more smooth balance between the selection and the background and to include even small squirts and drops of water there is an additional trick.
Keep ALT pressed while drag the left part of the white triangle icon of the slider to the left. Now you see that the triangle icon will be split to two icons which can be slided independently. By doing so you can define an additional range where the selection will be partly transparent and thereby smoothed.
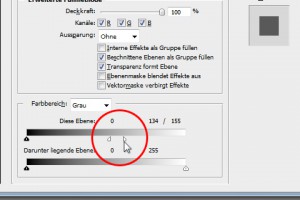
Define two color values – the area between both belonging triangle icons will be party transparent. All values which are right to the right triangle icon will be transparent, all values which are left to the left tiangle icon will be opaque. In my case the result is pretty good with 134 and 155.
Step 05: Masking the cut out water fountain
Now we have created a layer with the transparent water fountain – but actually we want the opposite. How do we get the selection of the water? In this stage we can change the values of the layer style anytime increase or reduce the transparent area, because the original image is still part of the layer. But if your settings for are ok we do not need this possibility, but you naturally can make if copy of your this layer if you like and keep it invisible for the next steps.
Next we create a new layer and drag it below the copied layer with the transparent water (important), select the above layer and merge both layer via CTRL+E.
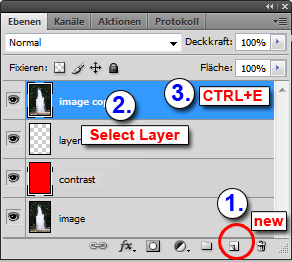
Now we have a layer named „image copy“ whith the transparent water selection. Click while CTRL pressed on the little preview icon of this layer to select all opaque elements of the layer.
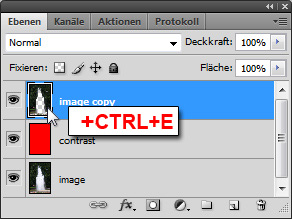
Now all pixel of this layer will be selected – which means all areas besides the water. Next we invert the selection (SHIFT+CTRL+I) and have finally exactly the selection of the water we need.
Select the original layer with the photo of the water fountain named „image“, create a new layer by copy (CTRL+J) and name it „selection“.
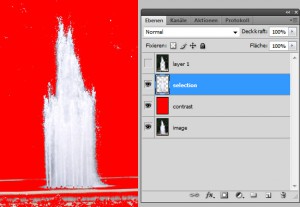
You see that still several areas of the background are included in the water selection. But we easily can select them by using the Lasso Tool (L) and delete them afterwards.
Now we have the final cut out water fountain!
Step 06: Merge the cutout water fountain with a new scenery
If you want to merge a rendered architectural visualization or just another photo with the water fountain you just drag the layer of the cutout water fountain in the new photoshop document.
To optimize composition with the new scenery I did the following steps:
– Creation of a basin for the water fountain by using the elements in the background
– Adding of a soft shadow below the water fountain
– Setting the layer blending mode to „Light Point“
In addition it is a good idea to smooth the edges of the new layer somehow to reduce the hard contrast between the new layer and the original scenery. Therefore I created a copy of my water fountain layer and transform it a few pixel to both sides and to the top. Then reduce the opacity of the new layer to about 20%. Repeat the step one more time with another scaling. In addition use a Blur Filter (e.g. Gaussian Blur to see the preview) to smooth the edges more.
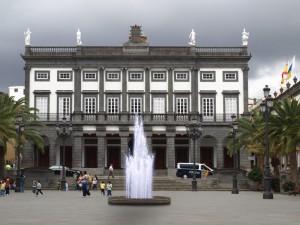
Finally I´m quite happy with the result which looks like this:

Please drop me a line in the comment box if liked the tutorial or you have any feedback and ideas. Thank you.


Great tutorial! I look for stuff like this all the time but so many times I’m left confused and frustrated after reading the tutorial and trying it. This was very well explained and the screen shots and shortcut tips are steely helpful. Please keep stuff like this coming. It’s great stuff and I know me and several of my colleagues are very thirsty for new, different and creative workflows. Much appreciated.
DB2 LANDSCAPES
A good tutorial, thanks. Think out of the box, that’s something you’ll never shout loud enough.
Just a minor stain: the simple past of “choose” is “chose”, not “choosed” (those confounded irregular verbs!).
Sorry Tony, someone had to tell you…
Hey Gilbert! Thank you for your feedback and not letting me die in ignorance… 🙂 I will make sure to remember it…