This should be a quick beginners-introduction of Sketchup for architects. I want to show you quickly how to make a 3D CAD model of a building using probably the easiest-to-learn software in the field of building architecture: SketchUp. This software can be downloaded for free from sketchup.com.
For now you are not supposed to have much previous experience in this software, all you need to do is go through this step-by-step guide and follow the instructions and of course a little practice afterwards. You will not need to read tons of boring theories preliminarily, instead you will study while drawing a real house.
Part 1 – SketchUp Basics: Using blueprints, drawing exterior walls
First we start with the basics of SketchUp. It’s very important to know what tools are available for you and to apply these tools to perform certain tasks, and this is the main goal of this tutorial. Once you are experienced enough in using SketchUp tools you will be proposed to apply these tools to start drawing a house. In this lesson you will study how to prepare and import blueprints as the basis of your design, how to setup the software for easier work and finally how to outline and erect exterior walls.
Sketchup User Interface
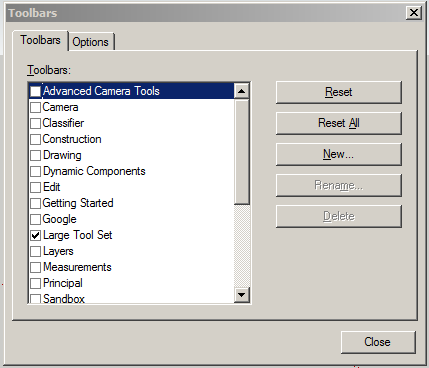
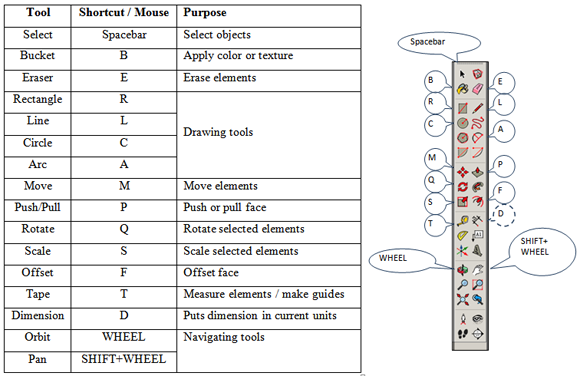
So, let’s get started. Open SketchUp. You can see empty area with just a model of a person that is useful to keep drawing proportions. There are only about a dozen tools in SketchUp that covers all you need to draw a house, and you will study these tools during this lesson. Most of the tools that you need are on the Large Tool Set toolbar, please activate it by menu View/Toolbars/ Large Tool Set (Fig. 1). Please find some description of tools and shortcuts (solid circles denote default shortcut, dashed circle denotes manually added shortcut – see below how to do this) on Table 1 and Fig.2.
Using shortcuts will significantly boost your performance. But it’s up to you weather to memorize them. Instead, you can reach tools via toolbox. Go to menu Window/Preferences/Shortcuts if you need to manage shortcuts.
Now, let’s get to modeling. You probably have floor plans of your house – either made by architect or hand drawn by you. Depending on the format of those drawings (JPG, PNG, PDF, DWG/DXF etc.) the following procedure may change a little bit. Let’s consider raster graphics formats first as it’s the most common case that moreover requires some additional work in comparison to CAD formats like DWG/DXF.
Use drag&drop method to place the file with floor plan into SketchUp. Find the list of supported formats on the figure above. Alternatively, you can use Import… dialog under the menu file.
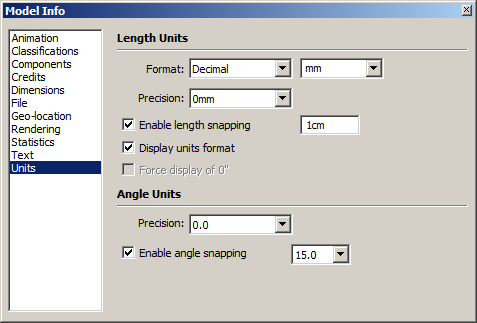
First of all, let’s specify units and precision. You don’t need to operate within the precision of 1mm or 1/16”, in building design reasonable precision is 1cm or 1”. Go to menu Window/Model info/Units.
If you work with inches – specify Inches as default units. Press <Enter> to apply changes. When you type dimensions in default units, you can omit unit sign. For instance, if your default units are Inches you can just enter 2’6 and SketchUp will interpret this to be 2’-6”. But you need to type 700mm because mm isn’t default unit. Turn on and setup length snapping to be 10mm or 1” to avoid fractional dimensions (like 2567mm) when drawing with mouse.
Let’s make this floor plan properly scaled so that we can outline structures, furniture – whatever is needed. With tool <T> press <CTRL> and measure current value of any known dimension – no mater interior or exterior. Try to use the largest dimension to minimize error. We may use 6330mm – width of the Living room. You will see as-measured dimension in the bottom left corner in the white text box. The current dimension is usually wrong. To specify true value just type that correct dimension (6330mm) right after you measured it. Note: do NOT try to place cursor in the text box – this won’t work. Just type.
Again, if you are using units that differs from default units (for example, model units are mm and you want to enter 14″), you need to type units as well right after numerical value. Possible dimensions to be typed are 1’2″, 2500mm, 2.5m etc. Do not type any spaces or dashes. You can omit units, in this case SketchUp presumes default model units.
So, you have typed correct dimension of the previously measured wall. Click Yes in pop-up to confirm scaling of the entire model and now you have your floor plan in real-world scale. To check this, measure again – you must obtain proper dimension.
Now, let’s protect the floor plan from any occasional changes. <RIGHT CLICK>, Explode; <DBL CLICK> on face, <RIGHT CLICK>, Make group; <RIGHT CLICK>, Lock. Now you are unable to edit the floor plan picture – and you don’t need this.
Time to draw lines! Use tools “R, L, E” to outline exterior of the house. Use “X-Ray” style (in Styles tool box) to see floor plan behind shape you are drawing. Please note that SketchUp extensively uses snapping – when you hover mouse over points or edges SketchUp builds additional temporary construction lines that make drawing process easier. Now you have drawing similar like this:
Use “F” to specify walls thickness. Select your shape, press “F”, click, drag and drop, then type the wall thickness to give more precision (e.g. 300mm, or 12″) and press <ENTER>. If you are OK with approximate dimension, do nothing after you drop the mouse. This technics is common for all drawing tools in SketchUp.
Delete interior part by selecting internal surface and pressing DEL, or with “E” tool. In 3D view use “P” tool to specify height of the walls.
Resuming, now you have basic skills in SketchUp, you are able to import a picture as a substrate for your future house, scale that picture to obtain correct dimensions, outline and erect walls.
In the next lessons we will continue to work on this house. We will place openings, roof, porch and walkway – basically exterior of the house.


Leave a Reply