Have you ever looked at a rendering and wondered just how the author creating such an interesting complex space and wished you could do something similar?
I recently found a nice video by Andrei Oprinca on how to make architectural renderings more interesting, complex and realistic. It’s full of great tips that I would like to elaborate on while adding a few of my own. The secret to this type of rendering in Photoshop is to add and keep adding elements to your image until the space looks real. Finding the appropriate stock images can be difficult and it can be time consuming to cut them all out, a great tool to speed up your renderings is to already have a variety of stock images to choose from.
Where to find free stock architecture images
If you want to start building your own archiviz image library or want to increase your existing library – definitely check out our free “openArchiVIZpack” for private and commercial projects:
The collection comes along with a set of ready-to-use cutout billboard elements in PNG format and tileable textures as well. But for visualization like the one we want to show you today you also need a lot of good architecture related stock images. We shooted over 4000 architecture related photos over the last years and published them for you on our website. So feel free and use them for your next private and commercial project:
OK – now that you know where you can get the images you need to start right away – lets take a look at Andrei´s nice tutorial about architecture visualization:
This video emphasizes the importance of having the correct perspectives and lighting to ensure that your renderings look realistic. There are certain tools in Photoshop that can maximize your rendering abilities while minimizing your time and effort and I am writing this article to help you unlock them and make your life easier, so I want to go trough the main functions every architect should know in Photoshop:
Photoshop Masks – A Must for Every User
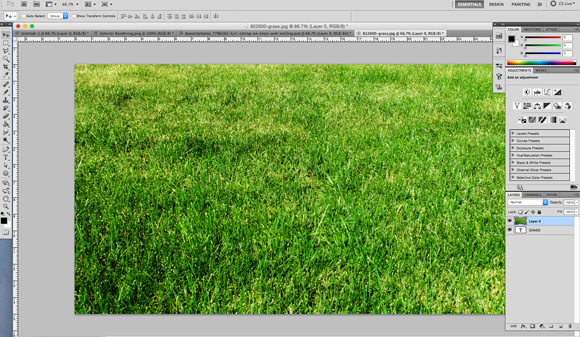
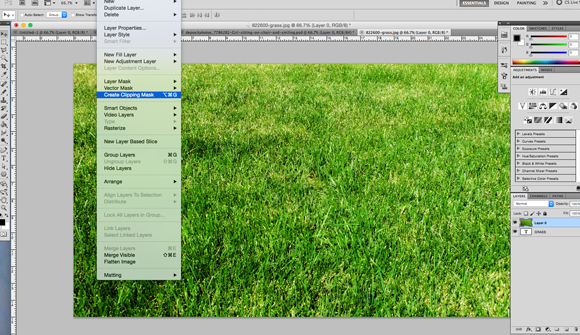
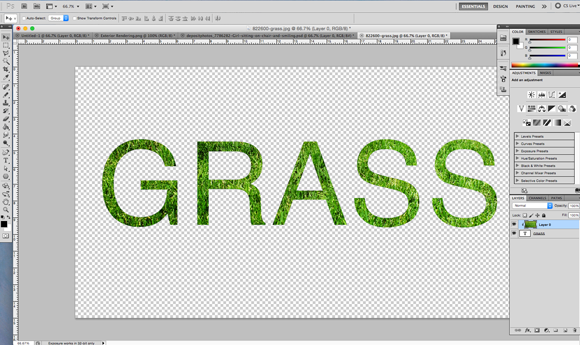
Masks are one of the best tools in Photoshop. There are two types of masks clipping masks and layer masks. The following images show you the general idea behind it:
Clipping masks are used to hide part of a drawing without completely removing it. While layer masks are used to change the opacity on part of the layer. There are a few reasons why masks are better than just deleting the part of the drawing that you are not using, first you may find that you need that part of the drawing later and it is difficult if not impossible to retrieve if you have erased it, secondly masks in combinations with an alpha channel can quickly hide the background behind complex imagery like a building saving you hours.
In the video Andrei uses the layer mask tool to hide part of the drawing. He does this by adding a layer mask and then tracing the area where he would like to add grass to with the polygon lasso tool finally he changes the rest of the mask to black isolating the area where he wants to see the grass, while hiding the rest. If you are using layer masks to create clipping masks remember that anything that appears black on your layer mask will be invisible on your layer.
I would suggest using a clipping mask instead of a layer mask to hide portions of a drawing in Photoshop. Using a clipping mask is an easier way to create the same function. In order to use a clipping mask put the layer you would like to hide above the shape you would like to see it in. Then simply go to layer > create clipping mask and it will crop the object above into the shape below.
Adapt Your Images To The Right Perspectives
Having the correct perspective is crucial to creating a realistic rendering. There are a few different ways that you can alter the perspective of an element of your rendering to ensure that your image passes the test:
Vertical/ Horizontal Smart Filters
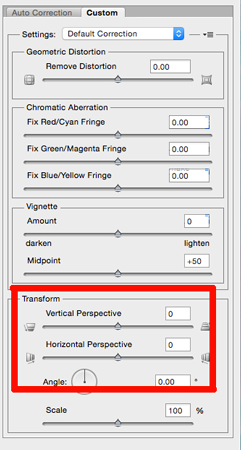
In order to do this you must first transform whatever layer or object that you would like to alter the perspective of into a smart object. You can do this through Filters > Convert for smart filters. Once you have transformed your layer go back up to filters and click lens correction > custom. This is where you can change either the vertical or horizontal perspective to help get things to start looking the way you want.
** These smart filters can also automatically correct the perspective on your photographs! If you go to Auto Correction and then choose the camera lens you shot your photo with it will automatically correct any skewing the lens may have caused!
Perspective Grid
If your like me and have trouble telling if something is in perspective or not this tool will become your new best friend. By creating a new layer then going to filter > vanishing point you can create a guidelines that can help show you what height or distance the objects within will need to be in order to ensure they are the correct perspective. This tool is simple to use just ensure that you pull on the corners until the box turns blue indicating that the lines are in perspective.
**If you’re using CS6 or later you can also easily create a 1-point or 2-point perspective using vanishing points. You do this by selecting shape > polygon, then you will need to change the polygon settings. First alter the amount of sides to 100 then just make sure that you indent your sides to 99% and that ‘star’ is checked. After these settings are set then you can click on the screen and drag out your 1-point perspective.
If you need a 2-point perspective instead you can just as easily create this by repeating these steps but dragging out the 1-point perspective on either side of your image. This will help you to create a series of guides and lines for you to follow making your drawings look more accurate.
Transformation To Change Perspectives
The easiest way to quickly change the perspective of any object is with the transform tool. Just press command T or go to edit > transform > perspective and you can grab the corner and manually adjust the perspective. This tool is great as it is so simple and you have so much control over the process.
Regardless of the tool you use be careful of skewing your perspective too much as that can be the difference between a beautiful and realistic looking image and one that looks just a little off.
Lighting in Architecture Visualization
Lighting is key to making your renderings look realistic, if things are lit from different angles your renderings may look off and be less convincing, even if the viewer is unaware of why. In this video Andrei gives lots of tips how to alter or add light and shadow to a rendering. Here I am going to focus on a few of my favorite.
Dodge/ Burn
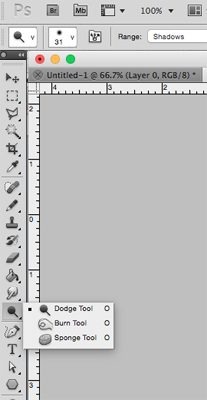
The Dodge and Burn tools are great to help add shade and shadow and create depth within a drawing.
To dodge means to add light to a certain area and to burn means to add shade or darken an area. These tools can be found in your tool bar on the left hand side. Once you have decided where you would like to add high or lowlights to your drawing you can adjust the size and hardness of the tool. Remember the harder your brush the sharper your edges will be. Then just click and hold down on the area you would like to alter.
Creating a shadow
Sometimes you have found the perfect element but it doesn’t come with a shadow. Don’t worry it is easy to create your own! This trick is also great if you are creating a rendering at dusk or dawn and you need to add long drawn out shadows. First you need to turn the element black, you can do this by highlighting the object using the magnetic lasso tool and then on a new layer and use your paint bucket to fill in the area. Once you have the same image in a completely solid color you can change the opacity so that it looks more like a shadow. Lastly all you need to do is use the transform feature to change the perspective to reflect where the actual shadow would lie.
Gradient
One of my favorite and easiest tools to add shade and shadow into a drawing helping make it look more realistic is the gradient tool. If you have an area of a building or built element that would realistically cast shade but the shade does not necessarily have to look like the actual object itself then this is perfect. I like to put my shadows on a new layer and adjust the opacity of the layer however you can also adjust the opacity right in your gradient opacity at the top of your screen. Now All you need to do is use the polygon lasso tool to highlight the area you would like to have shaded then go to your gradient tool, which will share the same object as the paint can on your side bar, You will want to have foreground to transparent selected then you just click your curser where the shadow would begin and drag it to wherever you would like it to stop. There you have a simple way to add a shadow.
There you go ensure that your renderings are always in perspective and lit properly while never deleting anything that you may want to use later. Use these simple tricks and keep your renderings looking realistic while saving time and energy!




Leave a Reply